 Improvements in Dimensional Control of Heat Treated Gears
The following study involves applying low pressure vacuum carburizing technology utilizing either direct oil or high pressure gas quenching in order to eliminate distortion. Frederick J. Otto**
Daniel H. Herring** ** Member of ASM International and member, ASM Heat Treating Society 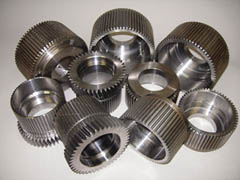 Figure 1: SAE 8620 Test Gears
|
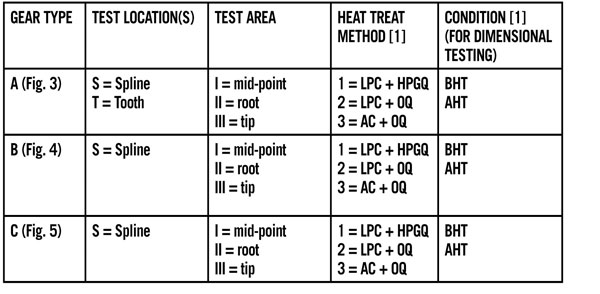
The goals and objectives of this investigation focused on highly distortion-prone gearing (Figure 1) to determine if dimensional improvements could be realized by applying low pressure vacuum carburizing technology utilizing either oil or high pressure gas quenching. The gears in question are traditionally atmosphere carburized and plug quenched.
Test Plan
Sampling Method
Process Parameters
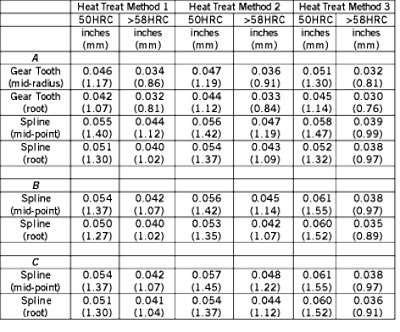
Table 2: Effective Case Depth (50 HRC) and Depth of High
|
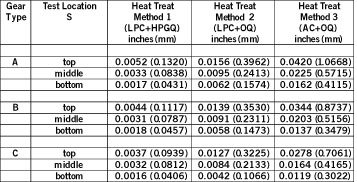
Distortion
Dimensional variation was determined by measuring both out of round (Table 7) and by coordinate measuring machine (CMM) measurement of the gear tooth profiles (Figure 6, Figure 7, Figure 8, Figure 9, Figure 10, Figure 11, Figure 12, Figure 13). With respect to the gear charts shown, the lead was measured across the tooth or spline from side to side at the pitch diameter. This method checked for excessive taper. The involute measurement was taken on the tooth form (active profile), starting from the root diameter to the tip of the tooth. Indexing (index error) measured the tooth spacing from tooth to tooth around the gear. Gear or spline run-out measured variation of concentricity of the centerline (datum) of the gear.
Table 7: Out of Round (Spline). Note: The existing heat treating method (atmosphere carburizing and plug quenching) results in out of round values typically in the range of 0.002”-0.003” (0.0508-0.0762 mm).
Microstructure
Analysis of part microstructures from low pressure vacuum carburized gears (Photomicrograph 1, Photomicrograph-No2, Photomicrograph 3,) taken from all areas (tip, mid-radius, root) revealed a tempered martensite structure with small amounts of retained austenite. Atmosphere carburized gears (Photomicrograph 4, Photomicrograph 5) revealed the presence of large amounts of retained austenite (tip, mid-radius).
Conclusions
The following are the principle results of this investigation:
• Low pressure vacuum carburizing in combination with high pressure gas quenching produced consistent repeatability. This degree of predictable movement is capable of being compensated for in the manufacturing process.
• Low pressure vacuum carburizing in combination with high pressure gas quenching allowed for the replacement of atmosphere carburizing and plug quenching on the gears investigated in this study.
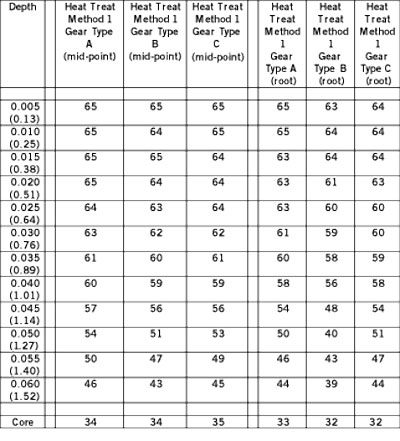
• The depth of high hardness (> 58 HRC) was greatest in the low pressure vacuum carburized samples.
• The root-to-pitch line case depth ratio was superior in vacuum carburizing (approximately 93 percent, versus 63 percent).
• Atmosphere carburizing resulted in unacceptable levels of retained austenite.
• Gear charts indicated an average movement of 0.003” (0.08 mm). The involute form remained intact after low pressure vacuum carburizing and gas quenching, as did the lead on the gear teeth and splines.
Acknowledgments:
The authors would like to thank Andrews Products, in particular Mark O’Neill, gear engineer, for his insights into the test results, and Dan Guy and Eddy Cespedes of the gear department for their assistance with measuring the test gears.
About the Authors:
Daniel H. Herring , also known as “The Heat Treat Doctor,” is president of The HERRING GROUP, Inc. He can be reached at (630) 834-3017 or dherring@heat-treat-doctor.com. Go online to [www.heat-treat-doctor.com]. Frederick J. Otto is president of Midwest Thermal-Vac [www.mtvac.com].
Vacuum Carburizing |
Heat Treat |Plasma
Nitriding | Vacuum
tempering | Directory | Resources
All mtvac.com content is copyright© MtVac2008
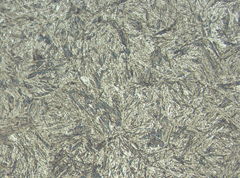 Photomicrograph 1: Clutch Gear “A,” Spline Mid-Point (LPC + HPGQ) 1250X Nital
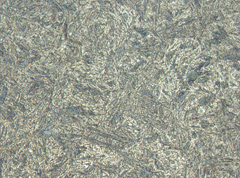 Photomicrograph 2: Clutch Gear “A,” Gear Tooth Mid-Radius (LPC + HPGQ) 1250X Nital
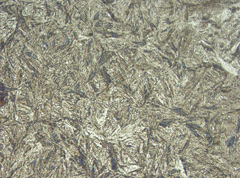 Photomicrograph 3: Clutch Hub “B,” Gear Tooth Mid-Radius (LPC + OQ) 1250X Nital
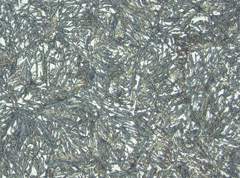 Photomicrograph 4: Clutch Gear “C,” Gear Tooth Mid-Radius (AC + OQ) 1250X Nital
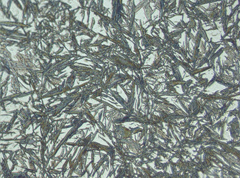 Photomicrograph 5: Clutch Gear “C,” Gear Tooth Tip (AC + OQ) 1250X Nital
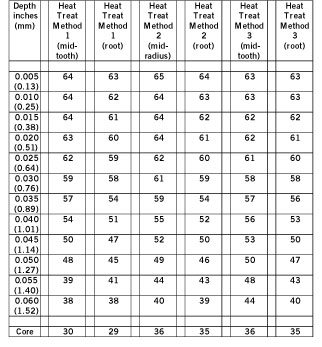
 (left)Table 3: Hardness Profile Gear Type A, Test Location: Gear Tooth
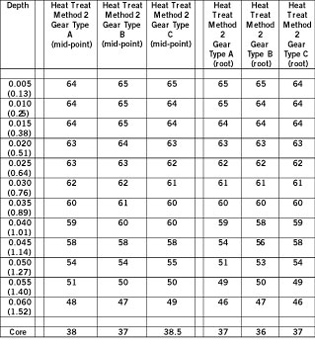
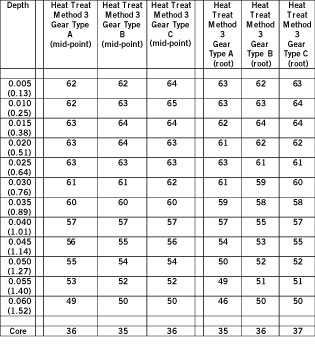 (left)Table 5: Hardness Profile Gear Type B, Test Location: Spline